Choosing the right sewing machine needle is one of the most important – yet often overlooked – parts of any sewing project. The needle does all the hard work, piercing fabric thousands of times, yet it’s also the most delicate part of your machine. Using the wrong type or size can lead to broken needles, skipped stitches, or uneven seams.
In this complete guide, you’ll learn everything you need to know about sewing machine needles – from the anatomy and needle systems to types, sizes, and how to match each needle to the right fabric and thread. By the end, you’ll understand exactly which needle to use, how often to replace it, and how to avoid common problems like breakage or poor stitch quality.
What you need to know about Sewing Machine Needles
By the time you have finished reading this guide, you will know everything there is to know about the sewing machine needle! In this guide we will:
- Go over the different parts of the sewing machine needle
- Discuss the different needle points you can get
- Talk about the different types of needles and when to use them
- Review different needle sizing systems
- Review the top needle brands
- Cover how often needles should be replaced
- Discuss why needles break and how to avoid it
Whew, that’s a lot to cover! Let’s get started.
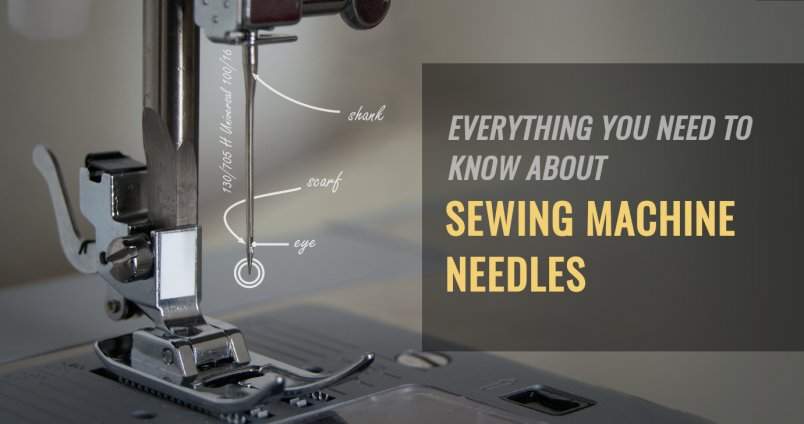
Anatomy of a sewing machine needle
First, let’s take a look at the different parts of a sewing machine needle.

Here is a quick description of each of the main components:
- Butt – end of the needle, which is inserted into the needle clamp when you change your needle.
- Shank – this is the thicker top part of the needle. It usually has a flat side. When you change your needle, make sure you insert it into the needle clamp with the flat side away from you.
- Shoulder – this is the section which tapers the thickness down from the shank to the shaft.
- Shaft/Blade – this is the main body of the needle, between the shoulder and the eye.
- Groove – the groove is an indentation in the shaft at the front of the needle, which provides a small channel for the thread to sit in.
- Scarf – the scarf is a small concave section at the back of the needle, just above the eye. It makes it easier for the bobbin hook to grab the thread, and in doing so reduces the risk of skipped stitches.
- Eye – the eye of the needle is the hole which your thread passes through. The eye will have different lengths depending on the type of needle.
- Point – the point and tip of the needle are the parts which help the needle penetrate through your material. There are several types of needle point, which I look at in more detail further down.
Who would have thought such a tiny object could have so many different components, each serving their own specific purpose!
Having a good understanding on what each part of the needle does will help you understand why different needles act in different ways, and could even help you diagnose issues with your stitching (skipped stitches anyone?!).
Needle systems
Before we get into the specifics of different needles, we need to make sure we understand needle systems.
Household sewing machines only take needles which have a shank which has a flat back and which have a scarf. This is referred to as the 130/705 H needle system. The H in 705 H stands for the German word Hohlkehle, which means “with scarf”.
If your needle is from the 130/705 H system it will most likely be suitable for your domestic machine. This system is also sometimes referred to by the names 15×1 and HAx1 The needle system is usually written on the needle box or packaging, alongside the needle type and size (more about those later!).
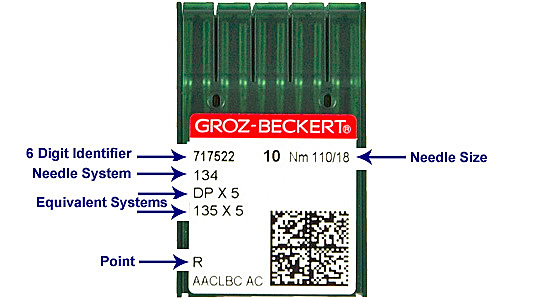
Industrial machines or older machines may use needles from other systems. Some older Bernina domestic machines for example take needles from the 705 B system – these needles do not have a scarf.
So in summary, if you have a modern household sewing machine, make sure you buy needles with “130/705 H” on the packaging!
Needle points
The point is the part of the needle that leads the way through the fabric. It can be shaped in many different ways, with different shapes being best suited for specific applications. Some of the most common needle points are:
- Ball point – this point is mostly used for knit fabrics. The point has a ball-like shape which allows the needle to push the yarns of the fabric to either side as it moves through it, rather than slice through them.
- Set point – sharper than the ball point, this needle point is mostly used for woven fabrics.
- Wedge/cutting point – this point cuts directly through the material, and so is best suited for very dense materials like leather. You can find out more about working with these types of materials in my guide to sewing machines for leather work.
The image below shows the differences between these needle points.

There are many different variations on these three needle points. Ball points for example come in light, medium and heavy variations, which have varying levels of roundness.
What are the different types of sewing machine needle?
When choosing the right sewing machine needle for a particular project, you need to make two choices – you need to choose the needle type and the needle size. Let’s talk about needle type first.
There are several different types of sewing machine needle. You should choose your needle type based on the type of sewing you are doing and the type of fabric you are using.
The table below lists the most common needle types, the needle point they have, and when you would use each of them. It’s always handy to have a reference table to hand – if you’re new to sewing I would recommend printing one out and keeping it folded up in your sewing machine accessory tray.
| Needle Name | Needle Point | Application |
|---|---|---|
| Universal | Light ball point | Between a sharp point and medium ball point, this is a general purpose needle which can be used for most applications without issues. |
| Jersey | Medium ball point | Used for knit fabrics, the ball point on this needle pushes the yarns apart instead of cutting through them. |
| Stretch | Medium ball point | Used for stretch materials – similar to the Jersey needle, the ball point on this needle avoids cutting through fibres, which would be disastrous for a stretch material. The scarf on this needle is specially designed to prevent skipped stitches. |
| Sharp/Microtex | Sharp set point | The very sharp point makes this needle ideal for tightly woven fabrics including synthetic materials like polyester, silk and laminates. |
| Jeans | Sharp set point | Great for denim or densely woven fabrics. The sharp point allows the needle to penetrate these fabrics more easily. Good for heavy duty projects. |
| Metallic/Metafil | Sharp set point | Used with metallic or synthetic threads – this needle has a longer eye with a non-stick coating which helps prevent shredding and breaking of the metallic thread. Also easier to thread due to the larger eye. |
| Embroidery | Light ball point | These needles sometimes have special coatings to help deal with the extra heat generated by the faster embroidery stitching speeds. |
| Quilting | Light ball point | A stiffer shaft and tapered needle point allow this needle to more readily penetrate several layers of fabric, which is perfect for quilting. |
| Topstitch | Sharp set point | A topstitch needle has a larger eye to accommodate heavier topstitching threads. |
| Leather | Wedge/cutting point | Leather needles have a cutting point which allows them to slice through the densely packed structure of leather. |
| Quick-threading/Self-threading | Light ball point | These needles are the same as a universal needle but have a slot into the eye which makes them much easier to thread. |
Schmetz have a good breakdown of their needle types on their website.
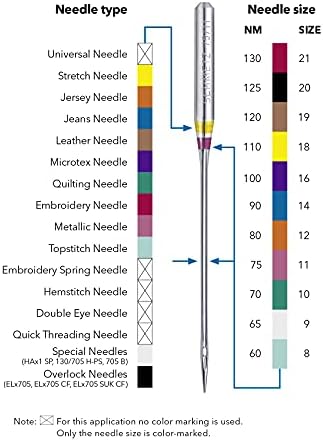
Needle Sizes
Each type of needle also comes in a number of sizes. When we talk about the size of the needle we are not referring to its length (all sewing machine needles for household machines are of the same length). We are referring instead to to the diameter of the needle shaft.
Choosing the right needle size
Choosing the needle size correctly is as important as choosing the needle type.
You choose the size of your needle based on the material you are working with and the weight of the thread you are using. Selecting too large a needle for the thread you are using will increase the likelihood of skipped stitches. You will also end up with a poor looking result as the holes in your fabric will be much too large for the stitches. A smaller needle should be used for lighter fabrics.
Sizing systems
Needle sizes are defined in two systems – the American system (also known as the Singer system because Singer originally came up with it) and the European system. The European size is the diameter of the needle shaft in hundreths of a millimetre. A 90 needle for example will have a diameter of 0.9mm, and a 110 needle will have a diameter of 1.1 mm.
The table below lists the different needle sizes in both the American and European systems. The recommended fabric weights corresponding to each needle size are also shown.
| American | European | Fabric Weight |
|---|---|---|
| 20 | 120 | Very heavy |
| 18 | 110 | |
| 16 | 100 | Heavy |
| 14 | 90 | Medium |
| 12 | 80 | Light |
| 11 | 75 | |
| 10 | 70 | Fine |
| 9 | 65 | |
| 8 | 60 |
Some needle types only come in certain sizes. For example topstitch needles will only come in larger shaft sizes.
Top sewing machine needle brands
Only a limited number of companies manufacture sewing machine needles for use in household sewing machines. The main manufacturers are:
- Schmetz
- Organ
- Klasse
The following sewing machine brands also market their own needles, but they are mostly rebranded from one of the big needle manufacturers:
- Singer – I believe their needles are manufactured by Grosz Beckert.
- Bernina – these are rebranded Schmetz needles
- Janome – these are rebranded Organ needles.
- Inspira – this is a brand of needles owned by SVP, the company which owns the Singer, Pfaff and Husqvarna Viking brands, and so you will often see these needles recommended for use in Pfaff and Husqvarna machines. I believe that these are the same as Klasse needles.
To be perfectly honest I do not see too much of a difference in quality between needles from different brands.
I would advise sticking with whatever needle is recommended by the sewing machine manufacturer, but to get cheaper needles I would buy in bulk from the original manufacturer (e.g. buy Organ needles in bulk for a Janome machine instead of the Janome-branded ones). As always, carefully test each new needle you use.
Needle colour coding
Different brands use different methods and colours for telling needles apart, which can make things confusing.
Here is a quick summary:
- Bernina and Schmetz needles have two colour bands printed on the needle shoulder. The top colour indicates the needle type and the bottom colour indicates the needle size. Singer needles are similar but the entire shank is coloured to indicate needle type, and the shoulder is coloured to indicate needle size. Note that not all needles will have an associated colour. Universal needles for example are often uncoloured.
- The shank of Klasse needles is stamped to indicate needle size and type, but the boxes the needles come in are colour coded.
- Janome and Organ needles needles are mostly not coloured, but three speciality needles have coloured shanks (which they call blue tipped, purple tipped and red tipped needles) and come in one size only.
Why do sewing machine needles break?
Breaking a sewing machine needle can be a frustrating and rather scary (not to mention dangerous!) occurrence. Knowing some of the causes of broken needles can help you avoid this unpleasant experience. Here are a few of the most common causes:
- Needle type or size not suitable – Always make sure you have chosen the correct needle for the job, and test on scraps before starting your project.
- Pins – If you are using pins and forget to remove one before it passes through the machine, there is a good chance your needle will break if it hits it. If it doesn’t break from hitting the pin, it may still be bent and could break at any time.
- Needle not inserted properly – Make sure you follow the instructions that came with your sewing machine for replacing needles.
- Needle is bent – If the needle is bent, there is a very high risk of it contacting part of your machine and breaking. Always check that your needle is not bent before starting a project.
- Pulling fabric – If you pull your fabric through the sewing machine rather than letting the feed dogs do most of the work, you run a good chance of breaking a needle by causing misalignment between the needle and the needle plate or presser foot.
- Poor maintenance – Lint in your bobbin case or in the needle plate can result in broken needles. Be sure to clean your machine regularly.
- Thread not feeding properly – if your thread is not unwinding freely from the spool, or is getting caught somewhere in the thread guides due to incorrectly threading the machine, the thread will be under tension and you run the risk of breaking your needle.
Remember – whenever you change the needle in your machine, always use the handwheel to manually lower the needle first. This is to make sure that it is correctly aligned and does not hit the needle plate or presser foot.
How often should I replace my sewing machine needle?
Guidance about how often to replace your sewing machine needle can be confusing. Most manufacturers recommend replacing your needle after a certain number of hours of sewing:
- Singer recommends replacing your needle every 8 to 10 hours of sewing in some guidance, but every 16 hours in this FAQ.
- Bernina recommends replacing your needle every 4 to 6 hours of sewing.
So it is difficult to get a consistent answer. In addition to that, the fact is that different machines run at different speeds. So the total number of hours of sewing isn’t necessarily the best way to measure when to replace a needle.
Some recommendations tell you to replace your needle after a certain number of stitches (10,000 stitches, for example). But this is also very difficult to measure. Others recommend replacing the needle after you have been through a certain number of bobbins. This has the advantage of being easier to measure.
In any case I would recommend inspecting your needle before every project, and replacing it more often than you think you should. Needles are cheap, and it is a false economy to try and run a needle for as long as possible.
Bear in mind that titanium plated needles do not dull as quickly as regular needles. Janome claim that their titanium-coated needles last for up to 40 hours of sewing.
Let’s discuss!
I hope you enjoyed reading through this guide to sewing machine needles, and that you learned a thing or two along the way!
Have a favourite needle brand? Or a few additional tricks for how to avoid broken needles? I would love to hear from you in the comments below!
Please can you tell me why flat sided needles for domestic machines are so much more expensive – to industrial machine needles .
Thanks
Please can you tell me why needles have a flat side AND what are the consequences of inserting the needle with the flat side forward?
Is each side of the eye different?
I have been having problems due to fitting the flat side facing me!!
Best regards
Steve from Berkshire
hello
What kind of needle did you buy?
What kind of sewing machine do you have?