
When you first start sewing, stitch length is easy to overlook. Whether it is pre-set on a computerized machine or controlled by a dial on a mechanical model, most people simply sew with the default and move on.
That is fine for many beginner projects. The default length is usually workable for basic seams on common fabrics. As your projects get more specific, though, fabric weight, stitch purpose, and construction details start to matter. Learning how to choose and change stitch length is one of the simplest ways to improve both strength and appearance.
What is Stitch Length on a Sewing Machine?
Stitch length is the distance between one needle penetration and the next. In practical terms, it is how far the fabric advances under the presser foot between stitches. The feed dogs control that movement, and the stitch length setting tells them how much fabric to pull through. A shorter setting advances less fabric. A longer setting advances more.
On most modern machines, stitch length is shown in millimeters. A setting of 2.5 means each stitch is about 2.5 mm long. Typical home machines offer a range around 0 to 5 mm, with some models going to 7 mm or higher on semi-industrial machines.
What is SPI (stitches-per-inch)?
Stitches-per-inch (SPI) is an older way of describing stitch length. Instead of measuring each stitch in millimeters, it tells you how many stitches fall in one inch of sewing. A pattern that calls for 10 SPI means ten stitches per inch. You mainly see SPI on vintage or older machines. On those dials, a higher number usually means a shorter stitch, because more stitches fit into the same inch. Vintage SPI ranges often run from about 4 to 60.
Why is it important to adjust the Stitch Length on a sewing machine?
Stitch length affects both durability and how the seam looks. Stitches that are too short or too long can sit poorly in the fabric, leave weak seams, or create puckering and stress points. The setting also changes how easy a seam is to reverse later. Short stitches are harder to rip out, so basting and temporary work usually need a longer length.
A few common reasons to change length:
- Leather and vinyl benefit from fewer needle holes, so a longer stitch is often better.
- Very thin fabrics need a shorter stitch so the seam does not pull or gather.
- Tight curves look smoother with shorter stitches. Long stitches can make a curve look faceted or jagged.
If you are shopping for a new machine, look for clear stitch length control. Many computerized models also suggest a starting length when you select a stitch, which is helpful while you are still learning what works.
How to adjust stitch length on a Sewing Machine
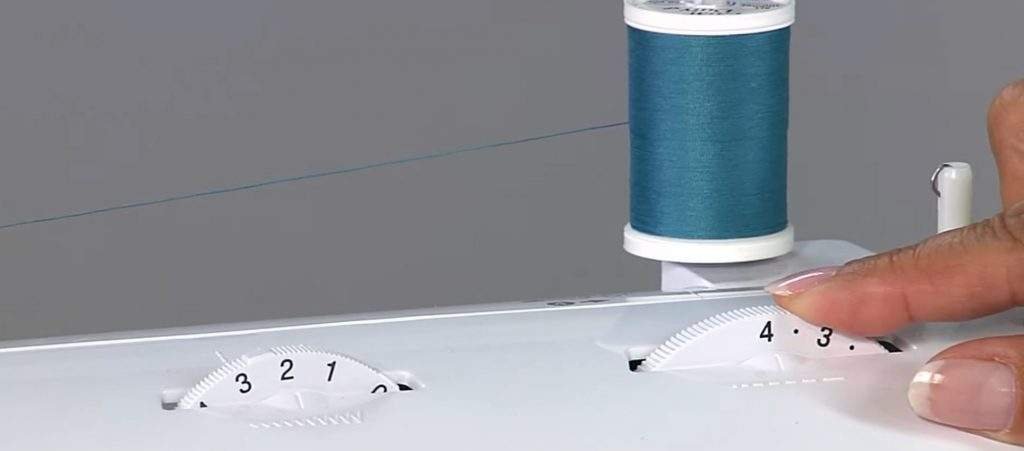
Most machines let you change stitch length in small steps. Many computerized models adjust in 0.1 mm increments (2.1, 2.2, 2.3, and so on). Some mechanical dials move in larger steps, such as 0.5 mm (2.0, 2.5, 3.0).
On very basic machines, each stitch pattern may come with a fixed length you cannot change. That is workable for simple sewing, but less flexible as projects get more varied.
On a mechanical machine, look for a dial or knob labeled “length,” or a scale that shows short to long dashes. Turn toward the shorter marks for denser stitching, and toward the longer marks for more space between stitches.
On a computerized machine, use the plus/minus buttons or the touchscreen control for stitch length. Some machines also offer automatic setting suggestions when you choose a stitch. One example with helpful preset guidance is the PFAFF Ambition 610 Sewing Machine – Review, Overview and Pros and Cons.
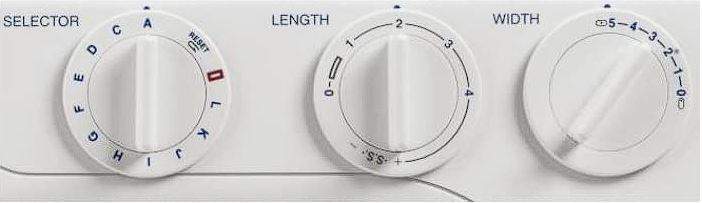
What occurs when the stitch length is changed?
Changing stitch length changes how far the feed dogs advance the fabric between needle punches. Lengthen the setting and the fabric moves farther. Shorten it and the fabric advances less, packing stitches closer together.
What stitch length to use while sewing
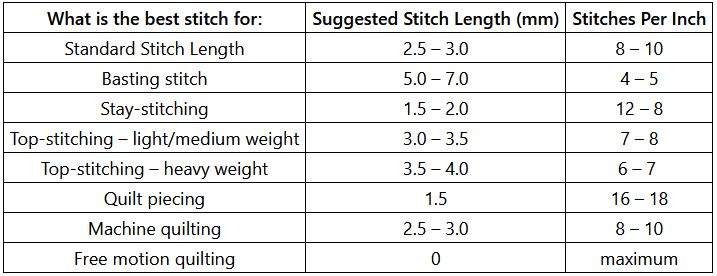
The right length depends on fabric, thread, and what the stitch needs to do. Most machines default somewhere around 2.0 mm to 2.5 mm, which is a solid starting point for everyday seams. Use the guidelines below as a starting range, then test on scraps from your project.
By Fabric Type
Thin Fabric
For thin or sheer fabrics such as silk charmeuse or chiffon, use a shorter length, about 1.5 to 2.0. A longer stitch can pucker lightweight fabric under the presser foot.
Medium-weight materials
Medium-weight woven fabrics usually sew well at the standard 2.0 to 2.5 range.
Heavyweight materials
For heavy fabrics and quilt sandwiches with multiple layers of fabric and batting, try a longer length, about 3.0 to 4.0. Short stitches can struggle to advance thick layers evenly.
Leather and Vinyl
Use a longer stitch so you make fewer needle holes. About 2.8 to 3.5 is a common working range. Too many closely spaced holes can weaken leather or vinyl and encourage tearing along the stitch line.
Knit Fabric
Knits usually prefer a slightly longer stitch. Stitches that are too short can pucker stretchy fabric and leave the seam looking tight or wavy. Pair length with a stretch-friendly stitch when the seam needs to move with the fabric.
By Stitch Type
Stitch purpose matters as much as fabric. The same fabric may need different lengths for construction, basting, or decorative work.
Basting stitches
Use at least 5 mm for basting, and up to 7 mm if your machine allows it. Long basting stitches are easier to remove after fitting or temporary construction.
Decorative stitching, quilting and topstitching
For decorative stitching, quilting, and topstitching, a slightly longer length (about 2.5 to 3.5, depending on fabric thickness) usually looks cleaner and more intentional.
Stay stitching
Stay stitching is meant to stabilize cut edges, so use a shorter length in the 1.5 to 2.0 range.
Paper piecing
Use a short stitch, about 1.3 to 1.6 mm, for paper piecing. The denser stitching helps hold pieces securely and makes it easier to tear the paper away later.
Quilt piecing
For quilt piecing, about 1.8 to 2.0 mm is a common range. It is short enough for strength without making seam ripping unnecessarily difficult.
Machine quilting
Machine quilting often looks best around 2.5 to 3.5. Quilt thickness, batting, and thread all affect the final look, so sample first.
Gathering
For gathers and ruffles, use a long stitch around 4.5 to 5.0 so you can pull the bobbin thread and distribute fullness evenly.
Curve stitches
On tight curves, shorten the stitch. Long stitches straighten across the turn and can leave a jagged outline.
Free motion quilting
For free-motion quilting, set stitch length to zero and drop or cover the feed dogs if your machine allows it. You control stitch length by how quickly you move the fabric under the needle. Not every machine can drop the feed dogs, so check the manual before planning free-motion work.
Thread thickness
Thread weight also influences what stitch length looks and behaves best:
- Thicker threads, such as 30wt cotton, generally pair better with a longer stitch.
- Finer threads, such as 100wt silk, usually look better with a shorter stitch.
- Metallic and rayon threads often sew more cleanly with a longer stitch.
- Monofilament threads can look less conspicuous with a shorter stitch that helps the thread nest into the fabric.
These ranges are starting points, not rules. Always test on a scrap of the same fabric, with the same needle and thread, before sewing the real project. Check that the seam looks even and holds under gentle stress.
Why are my stitches uneven?
Uneven stitches are one of the most common stitch length complaints, even when the dial or screen setting has not changed. Length is only one part of how fabric moves through the machine. These are frequent causes:
Fabric thickness
Fabric thickness can change mid-seam. On a jeans hem, for example, you may start with three layers and suddenly hit five at a side seam. Feed dogs move thinner sections farther than bulky ones, so stitch spacing can shift.
Slow down as you approach the thicker area. Stop with the needle down in the fabric at the last stitch on the thinner section, lift and lower the presser foot once to help the bulk settle under the foot, then continue. That small reset often improves feeding across the transition.
Pushing the fabric
Beginners often push or pull fabric instead of guiding it lightly and letting the feed dogs set the pace. Extra hand pressure stretches or compresses stitch spacing. Keep your hands guiding from the front and sides rather than dragging from behind the needle. For fabrics with uneven thickness or layers that shift, a walking foot can help both layers feed together and keep stitch length more consistent.
Incorrect Stitch Length for the type of fabric
Sometimes the selected length simply does not suit the fabric. On heavyweight material, a stitch that is too short can make feeding struggle, strain the needle, or bury stitches in the fabric. On lightweight silk, a stitch that is too long can pucker under the foot and look more like basting than a finished seam. On leather or vinyl, stitches that are too close together can weaken the material along the seam line.
When the seam looks wrong, adjust length to better match the fabric, then test again on scrap before continuing.
Other common issues
Presser foot pressure that is too low can also create uneven feeding, because the feed dogs cannot grip the fabric firmly enough. Check your manual for whether pressure is adjustable and how to set it for your fabric.
Upper thread tension that is too loose can make stitching look inconsistent even when length is correct. Re-thread the top path carefully so the thread seats in the tension discs, then make small tension adjustments as needed.
Also confirm the bobbin is wound and inserted correctly, and change the needle if stitching problems continue. A dull or bent needle is a frequent cause of irregular results.
Buttonhole sewing
Buttonhole problems can also be related to stitch length. If the machine stalls or packs stitches too tightly while forming a buttonhole, try a slightly longer setting. Many machines use a very short default for buttonhole stitches, and heavier coats or jackets sometimes need a bit more length so the fabric can feed through the dense stitching. Test on scrap that matches the garment layers before sewing the real buttonhole.
What is the correct length for Quilting Stitches
For machine quilting, about 2.5 to 3.5 mm is a common target. Quilt thickness, batting type, and thread all affect what looks best. Sample several lengths on a practice sandwich, then lock in the setting that looks even and holds well. Longer quilting stitches are often more visually pleasing than very short ones. For securing the start and end of a quilting line without backstitching, some sewists use a few very short stitches (around 0.5 mm) instead. That keeps the look clean while still anchoring the thread.
What Stitch length to use for decorative and zigzag stitches
Straight stitch is not the only place length matters. Zigzag and decorative stitches also rely on balanced length and width. If you widen a zigzag, you often need to lengthen it as well so the stitch stays proportional. For satin-style coverage, such as sealing pocket openings, zipper areas, or slits, a very short zigzag length (sometimes near 0) packs the stitches tightly. For sewing knits on a regular sewing machine instead of an overlocker (serger), a longer zigzag can give the seam more stretch and recovery. As always, test first: decorative stitches can look very different once fabric, stabilizer, and thread come into play.