
When you first start sewing, stitch length is usually something that is overlooked. Whether the thread length is pre-programmed in a digital machine or is set via the dial on a mechanical machine, most people will just start sewing with the default stitch length.
This is actually not a problem, as you should be able to use the default stitching for the majority of starter projects. The specifics will change based on the type of project you’re working on and you’ll learn what stitch length is needed as you sew more advanced items. The type of fabric you’re using and the project you’re working on will affect the length of your stitches. When you are starting to switching things up, you will need to learn how to select the correct stitch length, and what is appropriate for the type of fabric you are using.
What is Stitch Length on a Sewing Machine?
The length of each stitch that your sewing machine creates is known as the stitch length. It is the space between two needle punches made in quick succession by a sewing machine. Or it could also be explained as the distance the fabric moves between two needle jabs of the sewing machine. The amount of fabric drawn through with each stitch is controlled by the feed dogs, which are adjusted by changing the stitch length. There is less fabric pulled through for a shorter length and a longer stitch pulls more cloth through.
The stitch length on most contemporary sewing machines is usually indicated in millimetres. For instance, if you set your stitch length to 2.7, each stitch will measure 2.7 millimetres in length. Stitch lengths on most modern machines range from 0 to 5 mm while going up to 7 mm, and even higher for semi-industrial sewing machines.
What is SPI (stitches-per-inch)?
Stitches-per-inch is another measurement for the length of the stitches, it will instruct the machine on how any stitches you want per inch. For instance if you are doing a pattern that specifies a SPI of 10, the sewing machine would then sew 10 stitches in one inch. This system is no longer very common and can usually only be found on vintage or older sewing machines. If you have a vintage sewing machine that utilises the SPI system, you will need to adjust the stitch length within the range of 4–60. Because more stitches can fit in an inch in this instance, the larger the number, the smaller the stitch.
Why is it important to adjust the Stitch Length on a sewing machine?
So why do you need to adjust the stitch length? The quality and durability of your finished result are impacted by the stitch length when sewing and it’s therefore crucial to get it right. Too-short or too-long stitches make it difficult for the thread to cling to the cloth, which can lead to unforeseen fraying, pilling, and rips. Incorrect stitch placement can cause stitching problems that are difficult (or even impossible) to fix in addition to having an impact on quality. Some situations where you might need to adjust your stitch length is for instance sewing leather or vinyl as you want to minimises the amount of holes you make in the material. For very thin fabric, it is important to use a shorter stitch as otherwise they may end up pulling and gathering and if making turns while stitching, short stitches are necessary as a long stitch may make the curve appear jagged. Keep in mind that a shorter stitch is more difficult to remove, so if you know you’ll end up ripping it, use a longer stitch.
Choose a new sewing machine with a more sophisticated stitch length regulator if you intend to purchase one. Many of the newer computerised machines comes with pre-set setting recommendations when you select a stitch.
How to adjust stitch length on a Sewing Machine
Most sewing machines allow for simple adjustment of thread length for various stitch kinds. The majority of sewing machines, are often programmed in 0.1mm steps, such as 2.1, 2.2, 2.3, etc. While some are adjusted in 0.5mm steps so for instance: 2.0, 2.5, and 3.
For the really basic sewing machines the stitch normally comes pre-configured with the correct length and the length is fixed for each stitch. A great basic machine that
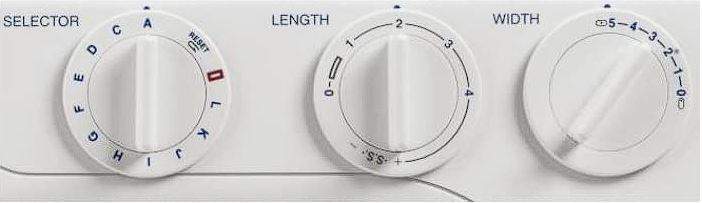
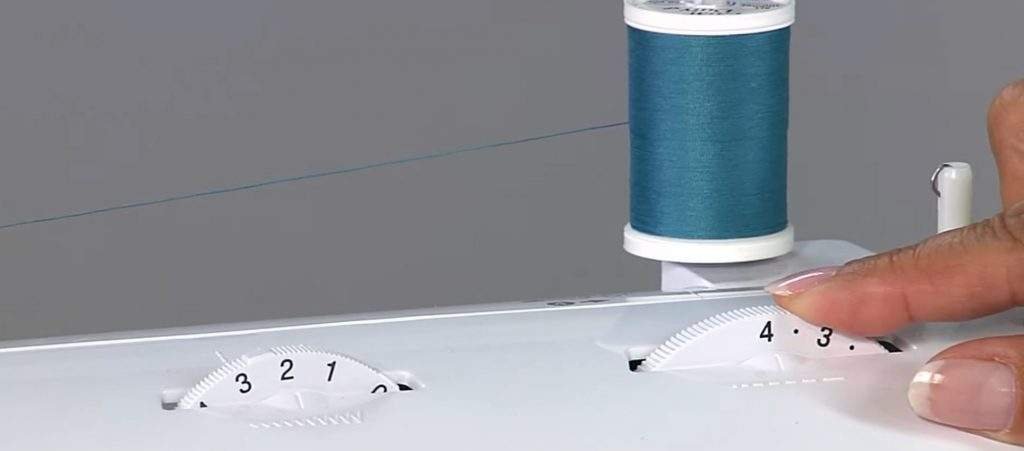
If your sewing machine is mechanical (i.e., not computerised), the front of the machine usually has a dial or knob with “length” written next to it or a dashed line ranging from short to long dashes.
To increase and reduce the stitch length on a computerised machine, you can either click a button or make a selection on the touch screen. Look for an option on a touch screen that says stitch length or it may have a manual button to press to increase or decrease. A good sewing machine that has an automatic settings suggestions is the: PFAFF Ambition 610 Sewing Machine – Review, Overview and Pros and Cons.
What occurs when the stitch length is changed?
The stitch length setting instructs the feed dogs on how much fabric to feed between stitches. The fabric will move farther between needle punches if the stitch length is lengthened. If you instead reduce the stitch length the feed dog’s will advance less fabric.
What stitch length to use while sewing
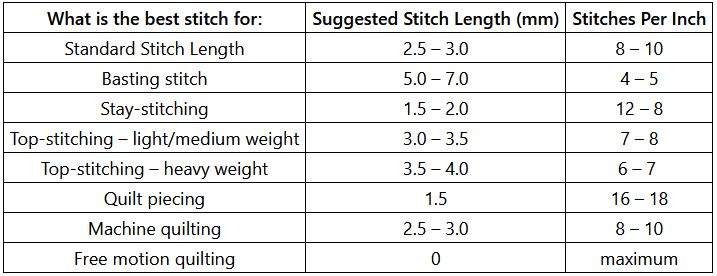
Depending on the fabric you are using on your projects you may need to use various stitch lengths, thread and the intended use of the stitch. Step one is then to decide what type of fabric you will be using for your specific project. The default stitch length on the majority of sewing machines is set between 2.0mm and 2.5mm. Here are some recommendations for the ideal stitch length to utilise in depending on the types of stitches:
By Fabric Type
Thin Fabric
Use a shorter stitch length for thin, sheer fabrics like silk charmeuse or chiffon (1.5-2). If not, the fabric can pucker.
Medium-weight materials
It is usually best to use the normal stitch length of 2.0 to 2.5.
Heavyweight materials
For heavyweight materials and quilts that have several layers of cloth and batting set the stitch length longer, somewhere between 3.0 and 4.0.
Leather and Vinyl
Use longer stitches to limit the number of holes a needle makes when stitching leather and vinyl. 2.8 – 3.5 would be a good setting.
Knit Fabric
For knits and other elastic textiles, use a larger stitch length. A lot of puckering will occur in knit fabric if the stitches are too small.
By Stitch Type
You also need to think about what type of stitch you will be using, as this also impacts the stitch length.
Basting stitches
Use a stitch length of at least 5mm (up to 7mm on some machines) for basting stitches so they are simple to remove.
Decorative stitching, quilting and topstitching
Use a larger thread length for decorative stitching, quilting, and topstitching (2.5 – 3.5 depending on the fabric thickness)
Stay stitching
Set your stitch length to less than 1.5 to 2.0 for stay stitching.
Paper piecing
Use a shorter stitch length of 1.3-1.6mm for paper piecing.
Quilt piecing
Use a shorter stitch length of 1.8 to 2.0 mm for quilt piecing.
Machine quilting
Set a larger stitch length for machine quilting (2.5 – 3.5)
Gathering
For sewing perfect gathers and ruffles a stitch length of 4.5 or 5.
Curve stitches
Use a shorter stitch for curves with a smaller radius as if you use long stitches it will make the curves look jagged.
Free motion quilting
The stitch length may be set to zero and the feed dogs removed for free-motion quilting. Instead hand-moving the fabric under the needle establishes the stitching’s length. Some machines, however, are unable to drop the feed dogs.
Thread thickness
The thickness of the thread you are using for your specific project is the next thing you need to take into account.
- Thicker threads, such as 30wt. cotton are best suited for a longer stitch.
- For thinner threads such as 100wt. silk, it is best to use a shorter stitch.
- For metallic and rayon type threads, a longer stitch length is preferable.
- When working with monofilament type threads, a a shorter stitch length will help further “conceal” the thread.
As always, these stitch lengths are merely recommendations, it is always safest to test your settings on a scrap of the fabric you’re using. Make sure the seam is sturdy and the stitch looks good before sewing on you main item.
What are my stitches uneven?
Even if you leave your project settings unchanged, uneven stitches are the most frequent issue with stitch length. Numerous factors can contribute to uneven stitches. When your stitches don’t look even, some of the most common issues are due to:
Fabric thickness
When you sew a seam, the fabric’s thickness could change. For instance, when sewing a hem on a pair of jeans, you begin with 3 layers of fabric and suddenly have 5 layers when you reach the side seam. A thicker fabric is handled differently by the feed dogs than a thinner one and it’s possible that the thicker fabric won’t move as far as the thinner one.
This issue can be fixed by slowing down as you get closer to thicker portions, stopping the machine with the needle in the cloth at the final stitch on the thinner area, raising and lowering the presser foot once more, and continuing the seam. This will make it possible for the thicker portion of the seam to position itself under the foot more effectively.
Pushing the fabric
This is an error that beginners often make, instead of letting the feed dogs do the job, you may be forcing the fabric through with your hands. To remedy this, avoid keeping your hand on the cloth behind the needle to remedy this issue, and instead let the feed dogs to move the fabric. Using a walking foot is preferable for textiles with varied thickness. The stitch length will remain constant if the walking foot is installed properly. The walking foot’s purpose is to assist in providing proper fabric grip for varying fabric thicknesses.
Incorrect Stitch Length for the type of fabric
Another issue that is frequently the cause of uneven stitches is that the length selected isn’t suitable for your fabric. For instance, the fabric didn’t even move because you used too few stitches for the heavyweight fabric, or the needle broke. Or perhaps nothing awful occurred, but the seam appears strange, as if the stitches were yanked into the fabric. Make the stitch length longer and more appropriate for the fabric.
Or perhaps you used longer stitches on a silk fabric that was lightweight, causing the fabric to pucker beneath the presser foot. Longer stitches may resemble basting stitches on thin cloth, which is not a professional finish.
On leather and vinyl, using too few stitches might cause the cloth to rip, utterly damaging your product. Always test your settings on a scrap of paper before applying them.
Other common issues
A few more options that might be the cause is if the presser foot pressure is too low. The feed dogs won’t be able to secure the cloth and you will need to increase the pressure. The best option to fix this particular issue is to consult the manual for your sewing machine.
If the upper thread tension is too loose, inconsistent stitching may come as a result. This is simple to fix by increasing the tension after making sure the thread is properly threaded through the tension disc.
Finally always makes sure the bobbin is properly threaded and switch out the needle if you still are having issues.
Buttonhole sewing
The stitch length settings may be the cause of your buttonhole sewing failure. If your sewing machine becomes stuck while making a buttonhole, try increasing the stitch length to see if that helps. For a conventional buttonhole, the standard stitch length on my Janome sewing machine is 0.45 but sometimes increase it to 1.0 when sewing buttonholes. Furthermore, I frequently need it when making buttonholes for heavier-weight coats or jackets.
What is the correct length for Quilting Stitches
For quilting, the stitch length should be between 2.5 and 3.5 mm. This will also be determined by the thickness of the quilt, the type of batting used, and the type of thread used. Test your stitch length on a scrap of fabric, experiment with other stitch lengths, and then fine-tune your settings before beginning your project. Longer stitches are usually more aesthetically pleasing. A well-made machine quilt should have uniform stitch length throughout. However, I’ve learnt to secure a machine quilted seam by using a very small stitch length (0.5mm) at the beginning and end of the quilting (instead of backstitching).
What Stitch length to use for decorative and zigzag stitches
Aside from straight stitches, your sewing machine has a number of other stitches that may all have their thread length altered. Controlling the stitch length is important when doing zigzag and decorative stitches. When using zigzag stitches, for example, it’s ideal to make them appear proportionate. If you increase the width, you should also increase the length. When utilising zigzag stitches, you may need to set the stitch length to 0; for example, I regularly use them to seal seams for pockets, zippers, slits, and so like. Alternatively, if you want to sew knit fabric with your regular sewing machine rather than an overlocker, you may need to increase the zigzag stitch length to its maximum length.